
In my Fenway Bra Sewing Inspiration post, I included a few bras that used lace. Last week in my Instagram stories I showed some options for using lace to recreate those inspirational looks. In this post I will show you exactly how to get those looks for your Fenway bra!
Lace Scallop Edge Neckline
The first method uses a lace scallop edge for the neckline. To get this look, your lace should be wide enough to accommodate the entire upper cup pattern piece. Of course if the lace you want to use is not wide enough, you can always piece the lace together but lace piecing requires its own dedicated blog post!

To modify the Fenway pattern to use a scallop edge, draw a straight line from the center front seam line to the uppermost point of the bra.While you lose the curved shaping of the neckline, you gain a lovely lace edge.

When you go to cut out the upper cup, position that straight line on your lace so that the center front seam line and upper most tip match up with a lace edge. You can read more about cutting lace in this post. Be sure to also cut the upper cup from a sheer lining to stabilize the lace.
Start your sewing by stabilizing the scallop edge of the lace with a narrow clear elastic or color matched elastic. Just place the stabilizer elastic on top of the lining on the wrong side of the upper cup, both positioned just below the valley of the lace scallops so neither will be visible from the right side of the garment. Attach the elastic with a zigzag stitch that spans the width of the elastic.

Sew up the rest of the bra as usual, omitting the fold over elastic from the lace scallop edge.
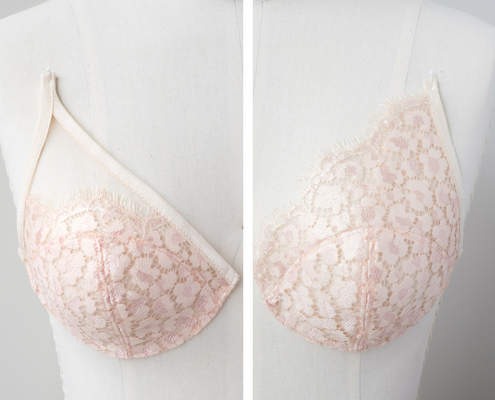
Lace Scallop Edge Cup
Achieving this lace look is a bit more work but what a lovely result!

The goal with this style is to give the appearance of the lace scallop going around the lower cup seam line. Of course the Fenway cup seam is very curvy so you won’t be able to match up a lace scallop entirely unless you want to do some lace piecing!
Without lace piecing, the way to get the most lace scallop around that seam with the Fenway bra is to start by focusing on the point above the notch on the upper cup. You should have at least ½” visible lace above the seam line over the notch. I found the best way to do that is to put a high point of the lace above the notch. Then adjust the pattern piece to capture as much lace scallop near the seam line as shown below.

On the pattern piece you will want to draw in reference lines, such as a solid portion of the lace edge, so you can align your pattern piece for mirroring and cutting. Note the pattern piece alignment will vary for each lace so you will need to draw in a new reference line for each lace.
Cut the lace from the lower part of the upper cup and cut a complete upper cup from bra tulle or other stable sheer fabric. To complete the effect, cut your lower cup pieces from the same lace and a nylon sheer cup lining.

To sew the cup, I like to start by using Sulky KK 2000 temporary adhesive spray (more on my love of this spray in this post) to temporarily bind the lace with the tulle and/or lining pieces.
Your first sewing step is to zigzag stitch the lace edge to the tulle on the upper cup as shown below. Then you can sew the bra up as usual!

P.S. If you like this lace, stay tuned for how you can get your hands on some!